-
Default Partitions – This step in the installation process shows the partitions created and the disk space allocated to each. Note that the first partition, /dev/sda1, is a non-LVM partition for the boot file system directory, /boot. The default size is 500 MB. The second partition, /dev/sda2, has been initialized for use by LVM. By convention, it’s called a physical volume (PV). The locked key icon at the end of that line tells us that it is encrypted. Recall that “Encrypt system” was selected in the previous step.
The upper part of this image shows the logical volumes (LVs) and the disk space allocated to each. And this is where the installer does a very bad job. Observe that all the disk space available in the volume group (VG) has been allocated to the the three LVs. The recommended practice when allocating disk space to LVs is to allocated just enough (to each) that the systems needs to be installed. The remaining unallocated space should then be available for creating additional LVs, or to grow existing LVs.
So let’s fix what the installer “broke.” We are going to edit the LVs in order to free up space. Let’s start with lv-root, the LV for the main file system directory. Select it as shown in the image below and click the Edit button.

The lv_root logical volume is selected for modification
-
Modify lv_root – The required change here is to reduce the size of the disk space allocated to this LV. For this example, I’ve chosen to allocate just 7 GB to it. Keep in mind that a fresh installation of Sabayon 5.3 takes up less than 5.5 GB of disk space. So 7 GB should be plenty. You may change the Logical Volume Name from “lv_root” to just “root.” OK. Repeat this step for “lv_home,” the LV for /home.
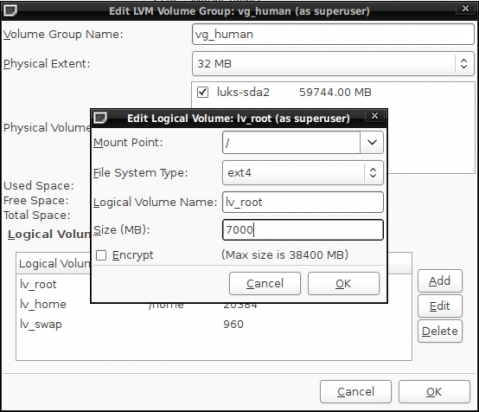
Modifying the size of the root logical volume
-
Modify lv_swap -The default disk space allocated for swap is, in my opinion, too small. I think 2 GB is more in line. You may also change the name from “lv-swap” to just swap. OK.
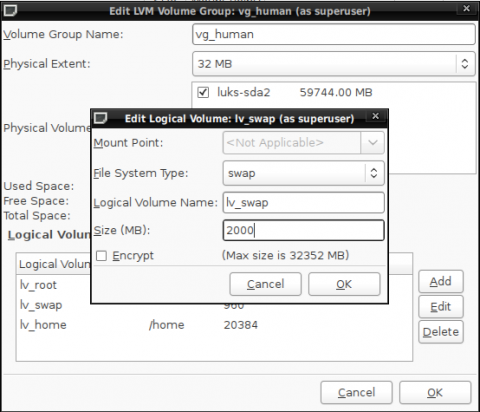
Modifying the size of the swap logical volume
-
Completed Disk space Modification – Here’s the final result of the surgical operating we just completed. Notice that we now have more than 30 GB of unallocated disk space in the volume group. Next to continue with the installation.
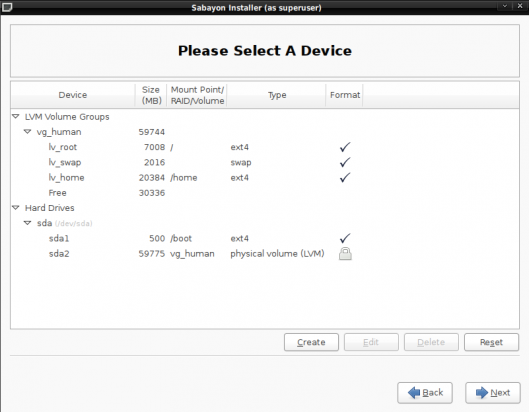
Final partitions showing the new sizes of the logical volumes
-
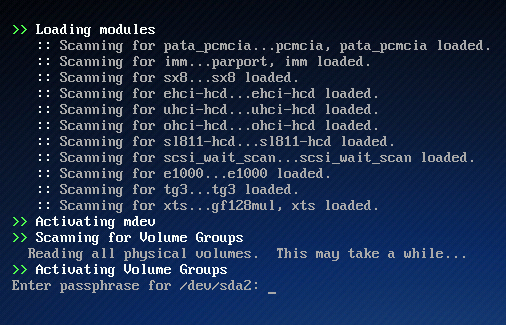
Disk Encryption Passphrase – Here the installer is requesting that you specify the passphrase that will be used to encrypt the disk. If you opted to not encrypt the disk, this step will be not presented to you. OK.
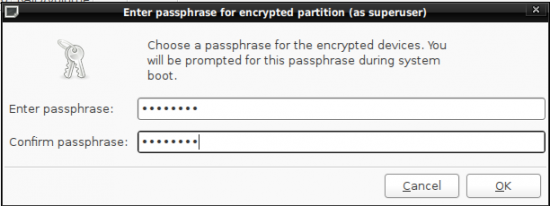
Specify the passphrase that will be used to encrypt the hard disk
-
GRUB Options – This is the boot loader step. The GRand Unified Bootloader, GRUB, is the only boot loader available here. An optional security measure available to you here is to password-protect GRUB. Specifying a password for GRUB ensures that:
- Access to Single User Mode will be denied to unauthorized users. A person assumes root privileges if he can boot into single user mode.
- Deny unauthorized users access to the GRUB Console. Changes to the configuration can be made, and useful information can be gleaned from the GRUB console. You certainly do not want to grant a rogue easy access to the GRUB console.
Just to be clear, specifying a boot loader password is optional. You do not have to do it. However, like the the disk encryption option, it is highly recommended. Next.
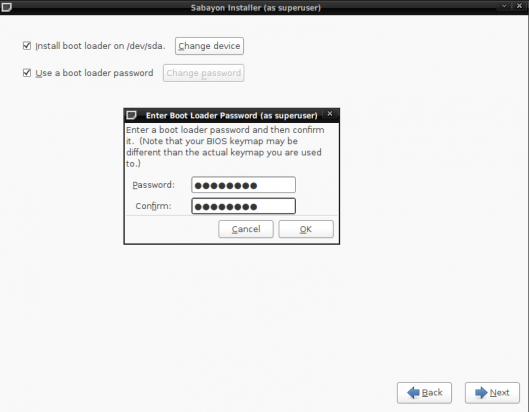
Specify a boot loader password
Sabayon 5.3 installation guide


