This is the second article on dual-booting Ubuntu Desktop 12.04 with Windows 7. But while the first one, how to dual-boot Ubuntu 12.04 and Windows 7, showed how to do it on a computer with a single hard drive, this one gives a step-by-step guide on how to do it on a computer with two hard drives.
If you have a computer with two hard drives or if you can afford to add a second drive to your computer, you give yourself the best hardware configuration for dual-booting, as it avoids the single point of failure that dual-booting on a single hard drive presents. And if you have a computer with UEFI firmware, see Dual-boot Windows 7 and Ubuntu 12.04 on a PC with UEFI board, SSD and HDD.
The operating assumption here is that Windows 7 is installed on /dev/sda, the first hard drive recognized by the system, and Ubuntu 12.04 will be installed on /dev/sdb, the second hard drive. And rather than use Ubuntu’s automated installation mode, all its partitions will be created manually. So aside from showing how to dual-boot Ubuntu 12.04 and Windows 7 on a computer with 2 hard drives, this article serves the secondary purpose of showing how to create partitions manually for installing Ubuntu 12.04 on any computer.
By default, the Ubuntu 12.04 is installed on two partitions – the root partition and Swap. For this tutorial, it will be installed on four – the boot partition, root partition, home partition, and Swap. The boot partition is where all boot-related file and folders are located. Root holds all installed programs, while home is the place for all user-generated data, that is, where your home folder and that of other users on the system are located. Swap is disk space that the computer may use as virtual memory. Creating a separate partition for home makes it relatively easy to upgrade the system without messing with your data.
After the installation has completed, the computer will always boot into Windows, since it is installed on the first hard drive. At that stage, you have two options, if you want to be able to boot into Ubuntu: Change the default boot disk to /dev/sdb in the BIOS, or add an entry for Ubuntu in Windows 7’s boot menu. Because Ubuntu’s installer automatically adds an entry for Windows 7 in GRUB’s boot menu, using the first method requires very little effort; no additional software installation is required. The second method involves installing a special program on Windows 7. From experience, the second method is not necessary, so the recommendation is to use the first method.
Ok, enough introduction. On to the task at hand. If you have not done so already, download an installation image of Ubuntu Desktop 12.04 for your platform from here. Transfer it to a suitable media, then boot the computer from it.
If you are new to Linux and are not familiar with disk partitioning in Linux, read guide to disks and disks partitions in Linux before diving into this. Also, reading tips for dual-booting Windows and Linux is highly recommended.
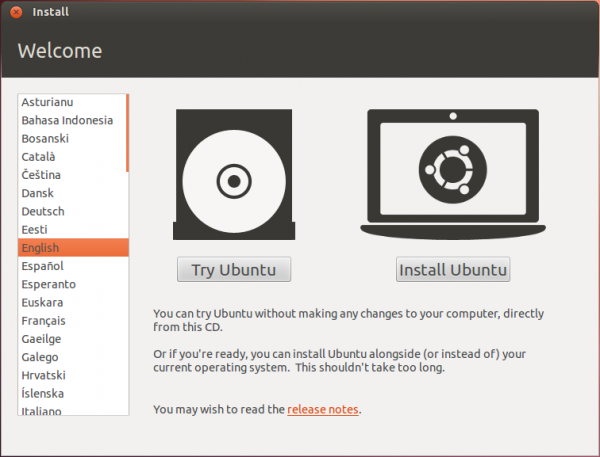
During bootup, you may opt to boot into a Live desktop environment or start the installation process without making a customary stop at the Live environment. If you boot into the Live desktop, start the installer by clicking on the Install Ubuntu 12.04 LTS icon on the desktop.

However you start the installer, click through the first steps until you get to the disk detection step. That step is shown in the image below. Since you are going to be creating partitions manually, select Something else, then click Continue. Keep in mind that even if you do not want to create partitions manually, it is better to select the same option as indicated here. That is the easiest way of ensuring that the installer will not overwrite Windows 7, which will destroy your data. The assumption here is that sdb will be used just for Ubuntu 12.04, and that there are no valuable data on it.

Selecting Something else and clicking Continue in the previous step should open the Advanced Partitioning Tool. You should see the disks and partitions connected to the computer. At the top of the list is sda, where Windows 7 is installed. You do not want to mess with that one. Any action you take here MUST be on sdb, the target disk for Ubuntu 12.04. If there are existing partitions on it, as in this example, delete them. You do that by selecting each partition and clicking Delete. Again, be sure that you are not messing with any partition under sda.

After all the partitions (under sdb) have been deleted, select the free space and click Add.


Hi! I know this post is pretty old and you might not follow it anymore, but i try anyway.
I installed Ubuntu 12.4 as you explained and everything went fine. I’ve set on my boot menu, priority first to the hard drive with ubuntu isntalled, but it always load Windows XP instead(installed in the main hard drive)
Have a missed something? My Bios is a dual wefi bios.
Thanks in advance for you help
Please repost your question in the Dual-boot category of the forum
Hi, I wish I read this article before! My question is…Can I still do this after I installed 12.04 on the Slave Drive? What I mean, can I reinstall 12.04 and do it like you have in the article. What I would like is for the computer to do is boot to Windows Vista first. Right now it boots to 12.04 unless I dont choose it to before the 10sec. run out. The first time I installed 12.04 on the Slave Drive I got this message:error: no such device: 42b5645e-9e24-4551-bdfe-259699182345 grub rescue>
I was able to repair it and it works fine but, I would still like to boot to Windows first since we share the PC at home and not wanting to confuse anyone at.
Sorry fot he long question,
-Mo
You actually don’t need to reinstall anything. Just make the Vista HDD the primary one, then add an entry for Ubuntu in its boot manager.
Thanks for you reply. I do have the Vista as the primary HDD but, it still wants to boot to 12.04 first and how do I add the entry for Ubuntu in the boot manager?
To add an entry for Ubuntu in the Windows boot manager, you’ll have to use EasyBCD, as described in this article.
Btw, wat type of computer are you attempting to install this on?
Hi,
I have two drives. Every time I go to install windows, no matter which drive I choose, when I go to install Ubuntu it shows Windows as being on /dev/sdb. How can I force Windows to be on /dev/sda?
I think you have to set the primary boot disk in the BIOS or UEFI utility. Then install Windows on that. When it comes time to install Ubuntu, it should correctly detect that Windows in on sda.
Do that and let me know if it worked out like that.
Hi- thanks for replying. I don’t have the ability to select primary disks in the BIOS (I am using a Lenovo x230 thinkpad). All I had was an option to “lock” the boot priority order. The reason I must get Windows on sda is because Windows won’t hibernate unless its on sda in a two-disk installation…..
If there’s an option to lock the boot priority order, there ought to be one to (re)set the boot order before locking it. Is your x230 thinkpad one of those with 2 HDDs or 2 SSDs?
Since I don’t have one on hand, you might want to call Lenovo to ask their help on this, because I doubt that it’s really impossible to change the boot disk order.
Two SSDs. Sorry I should be more clear- I can change the boot order fine- but this does not seem to be the same as setting the primary and secondary drive. I say this because when Windows kept getting relegated to /dev/sdb this disk was the first disk in the boot priority before I installed Windows 7.
The best howto I’ve seen so far. Explains what to do and why. Thanks alot.
The instructions worked just fine with a Windows XP system. Thanks!
I just added a second HDD and created a volume on it but when installing Ubuntu 12.04 only dev/sda is displayed and sdb is not being recognized.
The second HDD does appear in the device manager and Windows Explorer in Windows 7.
Any tips?
So you have Ubuntu and Windows dual-booted on sda and added a 2nd HDD to the system. Is that right? If not, explain what exactly you are trying to do.
Sorry about that, here it goes:
I have a computer with Windows 7 installed on the existing HDD and have added a second HDD, but have not yet installed Ubuntu.
When I attempt to install Ubuntu from the live CD I get as far as the “Installation Type” screen depicted in your instructions after selecting “Something else”.
On this page only my first HDD is displayed (sda) and “sdb” is not listed as an option. It does not appear that Ubuntu is recognizing the second drive.
Thank you for the tutorial and your help!
Todd,
Did you format your new HDD in Windows? Just plugging it in to the motherboard and power isn’t enough. Check under “My Computer” to see if the new drive appears.
If not: 1) Go to Control Panel, and in the search box (top right of screen) type in “disk management”.
2) Select “Create and Format Hard Disk Drive Partitions”
3) You’ll see a display of all your HDDs. The new one will probably be “Disk 1” and should be shown with a black bar. Right click on the name, and choose “Initialize disk”, then “MBR”.
4) Now you need to allocate it. If the new volume wizard doesn’t come up automatically, right click on the box for the partition and follow the cues. Format should be quick format, NTFS. You can do the partitioning you’ll want for Linux now, or just leave it as one single partition now, and subdivide later when you install Linux.
5) OK, check your work: go back to My Computer and verify that you can see the new HDD with the volume label and drive letter you gave it. If so, then reboot the live CD/USB and you should see your new drive.
4) Now you need to
I need a forum so bad. And I need something in the image and likeness of Stackoverflow. Any suggestions?
Great tutorial! I am new to this and have two quick questions. If I did everything as said in this tutorial but wanted to have a partition within the second hard drive(linux one) that I could access while in windows, how would I do that?
Second, if I want to have multiple distributions of linux also installed on the second hard drive, would I simply leave extra space and then do these steps with other distro and grub will allow me to select from the 3 OS’s?
To the 2nd question, the answer is a yes.
If you want to use a partition on the 2nd HDD for Windows, then just leave enough free space for it and create an NTFS partition using that space from inside Windows, though doing that defeats the whole point of using 2 HDDS for this, which is to keep both OSs completely separate.
Note that you cannot access a Linux partition from Windows, so don’t even try doing that.
Hello,
I’ve installed Windows 7 on /sda and after, Ubuntu on /sdb.
If I set in BIOS to boot from /sda, Windows 7 loads up, which is normal. If I set up to boot from /sdb, GRUB appears asking me which OS I want to load. If I go for Ubuntu, everything works fine but if I go for Windows 7, an error appears (“NTLDR is missing. Press Ctrl+Alt+Del to restart”). When Ubuntu was installed I made sure to set as device for boot loader /sdb1 (which is /boot partition). Should it be /sdb instead of /sdb1? Or there’s no difference? Am I missing something here?
Thanks in advance!
Yes, the device for boot loader should have been sdb instead of sdb1. Not saying that’s the cause of the problem, but you never know…
So you can log into Ubuntu, type grub-install /dev/sdb, then type update-grub
You can then make sdb the default boot device, so you get to choose between Windows or Ubuntu whenever you reboot.
I did what you said, but the problem persists. I see the entry for Win7 but it won’t boot from it.
At the end of “grub.cfg” I found this:
menuentry “Windows 7 (loader) (on /dev/sda3)” {
insmod ntfs
set root='(hd0,3)’
search –no-floppy –fs-uuid –set D62C67872C67618B
chainloader +1
}
Do you find anything wrong in this entry?
Thanks a lot for all the help 🙂
I reinstalled Ubuntu with device for boot loader as /sdb instead of /sdb1, with same result.
I solved the problem in the end using EasyBCD for adding an entry in Win7 loader for Ubuntu’s GRUB.
Thank you once again!