How to dual-boot Ubuntu 12.04 and Windows 7 and how to dual-boot Ubuntu 12.04 and Windows 7 on a computer with 2 hard drive provided step-by-step guides on how to setup a dual-boot system with those operating systems. They were based on test installations on computers with BIOS (Basic Input/Output System) firmware.
While the tutorials worked for people using computers with BIOS firmware, those using newer computers with UEFI firmware ran into one or more problems. UEFI (Unified Extensible Firmware Interface) is a replacement for BIOS, and it is very likely that any computer or motherboard you buy today will have UEFI instead of BIOS firmware.
Since I just built a new computer with UEFI firmware, I decided to recreate those tutorials to show how it should be done on computers with the latest firmware, and also to see if I will run into any of the problems that others have been reporting.
The computer used for this article is a custom-built one with an ASRock Z77 Pro4 motherboard, the same one I used for writing dual-boot Windows 7 and Ubuntu 12.04 on a PC with UEFI board, SSD and HDD. The only difference between that article and this one, is that this one shows how to set up the dual-boot system on single, 500 GB hard drive.
Since it is likely that you will already have an existing installation of Windows on your computer, the tutorial begins on a system with a fresh, default installation of Windows 7. That means, there are just two partitions on it – the Windows 7 System Reserved partition, and the main Windows 7 partition – the C drive. The task here is to shrink the C drive, freeing up enough room for Ubuntu. Then install Ubuntu on the free space.
To install Ubuntu, the partitions have to be created manually, with the following three partitions created: A boot partition; a root partition; and a partition for Swap space. GRUB, Ubuntu’s boot loader will be installed in the boot partition. After Ubuntu has been installed successfully, an entry for Ubuntu will then be added to Windows 7’s boot menu, so you will have a choice of OS to boot into from the Windows boot menu. That, in a nut shell, is the task at hand.
If you are new to Linux, have never set up a dual-boot system before, and are not familiar with disk partitioning in Linux, it is highly recommended that you read guide to disks and disk partitions in Linux and 7 tips for dual-booting Linux distributions and Windows.
Before you start messing with the partitions in Windows, download an installation image of Ubuntu 12.04 from here. Burn it to a CD or transfer it to a USB stick.
Let us begin.
1. Windows Partition Manager: Since we are starting with a system with an existing installation of Windows 7, we need to shrink the C drive. To do that, start Windows 7’s partition manager: Type partition into the search box and click the only item that appears. This screen shot shows what it looks like. On a single disk system like the one used for this tutorial, you should see two partitions as shown in this image. The one you need to mess with is the C drive. Do not touch the System Reserved partition. Right-click on the C drive and select Shrink Volume.

2. Shrink The C Drive: This window should open. Because my test system is a fresh installation on a 500 GB HDD, it has plenty of free space, and Windows has decided that it is save to shrink the C drive down to about 14 GB. That works for me and for the purpose of this tutorial. If you are satisfied with what you are seeing on this window, click the Shrink button.

3. Unallocated Windows Partition: Back to the main partition manager’s window, you should see the space that was recovered from the C drive. It is the one labeled Unallocated. That is what will be partitioned for installing Ubuntu. Close the window and reboot the computer. Be sure to put the Ubuntu installation CD in the optical drive before rebooting.

4. Ubuntu’s Installation Requirements: When the computer boots from the Ubuntu installation CD, start the installer either from the Live desktop or without first booting into the Live desktop. Click through the first few steps until you get to this one. This just tells you how much space you will need to install Ubuntu. Click Continue.

5. Ubuntu’s Partitioning Methods: You should now be looking at this step. You want to choose Something else. Why? Because that is the one that will allow you to configure the partitions manually and let you choose where the boot loader will be installed. The other options will create the partitions automatically, install GRUB in the Master Boot Record (MBR), which will overwrite Windows’ boot programs there. Continue. Selecting Something else else takes you to the Advanced Partitioning Tool.

6. Ubuntu’s Advanced Partitioning Tool: This is the Advanced Partitioning Tool. You can see the two NTFS (Windows) partitions and the space that was recovered from the C drive. In this screen shot, /dev/sda2 is what Windows calls the C drive. The System Reserved partition is /dev/sda1. Do not mess with either one. You will be creating partitions for Ubuntu using the free space. So, select it and click Add to start creating partitions. For this tutorial, only the boot, root and Swap partitions will be created. If you want, you can create another one for /home.


Thank you for nice information.
Hi Finid,
I have followed your tutorial to the letter trying to install Ubuntu alongside Windows 7 on an Asus laptop having UEFI system and GPT partitioning but when I tried to reboot into Ubuntu I got the same error that I encountered sometime back when tried to install wubi.
The error:
Windows failed to start. A recent hardware or software might have caused the error….
File \NST\AutoNeoGrub0.mbr
Status 0X0000098
The selected entry could not be loaded because the application is missing or corrupt.
I have tried different boot loader types (GRUB 2, GRUB(legacy) etc) when adding Ubuntu on EasyBCD but it still doesn’t work.
The only thing that I did differently during the installation is that, after creating the three partitions as you have recommended and clicking on ‘install’ the system suggested I go back and make another partition of type ‘Reserved bios boot area’, which I did and allocated 480 MB. I have even tried to book from this partition but it still doesn’t work.
Could you may be have an idea of what went wrong?
Thank you!
I’m getting the same error! And I basically did the same as you.
Can anyone help us?
Hi finid,
I have a brief question: is there a specific reason why, except for potential Windows Updating from Win7 to Win8, on all your installation guides you suggest to boot on Windows MBR instead of booting directly on the GRUB manager?
Does it have something to do with the UEFI or the Intel Rapid Storage Technology (when a small SSD exists)?
Last year my former computer crashed and I’m pretty sure I used one of your guide to install a dual-boot Win7/Mint Maya booting directly on the GRUB but I cannot see this tutorial anymore. Is it me or did you change the tutorial?
Thanks!
It’s not just upgrading Windows that could scuttle a dual-boot with GRUB in the MBR, but some 3rd party security solutions have been known to mess with the MBR.
Also, putting GRUB in a boot partition instead of the MBR makes it easy for you if you decide to remove the Linux distribution.
Btw, all the dual-boot tutorials are up and I did not change anything. Note, however that a few of these UEFI-related tutorials are not actually UEFI, because the system I used was booted in BIOS mode. But that does not apply to your case.
And I don’t think dual-booting in the manner given in the tutorials will cause a crash.
Also note that in most cases where a PC is said to have “small SSD,” that SSD is not actually a separate drive, but part of a single device that combines an HDD and a NAND Flash, so-called solid-state hybrid drive (SSHD).
Thanks for your reply!
I get your point. But then, when the PC boots on the Windows MBR what happens when Windows crashes? how can you boot on Linux (without a LiveDVD I mean)?
(if your tutorials are updated I must have mixed up last year when installing Linux, sorry for mentioning that.)
Regarding the UEFI, I had Windows 8 pre-installed on my new laptop. I managed to replace it with Windows 7 by deactivating the UEFI mode. So technically I’m not using the UEFI but it’s still there on one of my HDD partition (Gparted can see it) so I don’t exactly know if I should consider tutorials with or without UEFI…
As for my SSD of 24Gb, it is separated from the HDD.
When dual-booting on a single HDD, there’s a risk, whether you use GRUB or Windows loader as the master boot loader. That’s why the best route to go, is to use 2 HDDs, or 1 HDD and 1 SSD, or 2 SSDs.
If you are booting in BIOS mode on an HDD that came with Windows 8, the GPT data strutures are still on the HDD unless you zapped them. You might want to take a looks at this article.
Note that UEFI and GPT do not necessarily go hand in hand.
Thank you for the link to the article, it is very interesting. I never thought about this GPT issue before. Assuming (I have to check) that Windows 7 has been installed with the GTP table, is a dual-boot with Linux Mint hopeless when keeping the GTP table?
IF GPT data structures exist on the HDD before you installed Windows 7, it is very likely that the installation process did not wipe them. That could show up as an issues when installing Mint or any other distribution. If you are not using a GPT partitioning scheme, get try to get rid of any existing evidence of GPT before commencing an installation.
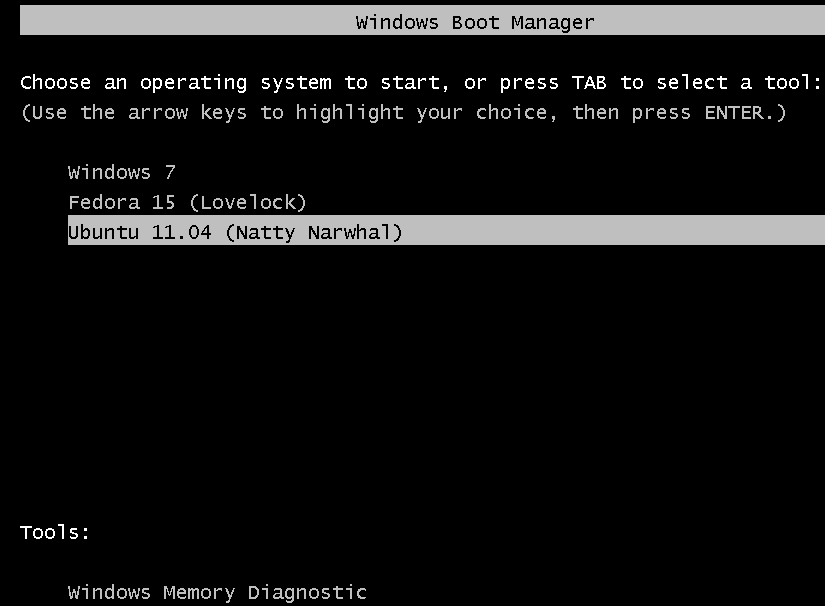
I get a choice menu to boot either Win-7 or Ubuntu
but Win-7 boots fine and Ubuntu does not boot at all.
When I choose Ubuntu I get to a Grub promt, no further.
Please help, thanks.
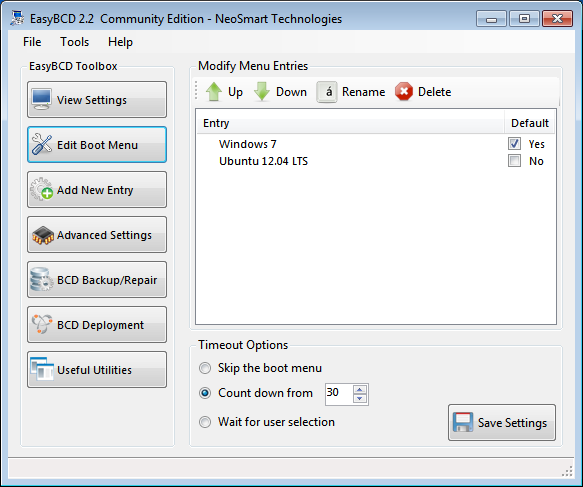
EasyBSCD reports as follows:
There are a total of 2 entries listed in the bootloader.
Default: Windows 7
Timeout: 30 seconds
EasyBCD Boot Device: C:\
Entry #1
Name: Windows 7
BCD ID: {current}
Drive: C:\
Bootloader Path: \windows\system32\winload.exe
Entry #2
Name: Ubuntu 12.04.2
BCD ID: {cb5d3b5c-df7d-11e2-aee4-a5c82e918538}
Drive: C:\
Bootloader Path: \NST\AutoNeoGrub0.mbr
Thank you for the tutorial. I followed your instructions to the letter and yet I am presented with a GRUB4DOS screen after choosing to boot from the Ubuntu 12.04 LTS entry created by EasyBCD. The partitions are exactly the same as you’ve set up so I don’t understand. The entry found and added by EasyBCD is Drive C:\ then Bootloader path \NST\AutoNeoGrub0.mbr
Now, the question is, how to do this with gpt partitioned drives?
Hi, could you tell me if this would work with dual booting ubuntu 12.4.2 with windows 8? I get the feeling windows 8 has made it even more difficult.
I managed to get to the ubuntu installation on my computer but it didn’t detect windows 8 OS and so i’m worried this will be a problem later…so haven’t installed anything yet…
oh and just to add, windows 8 is already pre-installed
Yes, it will be a problem, if the installer for Ubuntu does not detect Windows 8 on the disk. I first wrote about it here and gave the solution here.
Try the fix and let us know if it worked out for you.
i partitioned as described(for me i allocated a 25gb from my E-Drive) 25gb unallocated. Then i loaded ubuntu in pendrive. first time installing ubuntu it shows “unusable 25gb” in ubuntu partition list. so switched to win7 to check partition. it was same wat it was already as 25gb unallocated. now i try ubuntu,this time it showing as “C” as dev3 and “D,E,unallocated space” together as dev4. i cannot find the 25gb as free space how to get it to install ubuntu please help me. Thanks for ur help.
If Ubuntu’s installer is seeing the C drive as /dev/sda3, what is in sda1 and sda2?
That D and E are separate partitions after C (sda3), means that you have exceeded the max number of primary partitions that the partitioning scheme you are using supports. That max number is 4. That’s why E is showing up as “unusable” space. To be able to use it, you have to delete it, assuming that you do not have any data on it. And also no data on D.
Once you delete both, you can then use the combined space from D and E to install Ubuntu. If all this sounds foreign to you, take a few moments to read guide to disks and disk partitions in Linux.
Back to the first question. What is in sda1 and sda2?
used
sda1 reiserfs 1MB unknown
sda2 ntfs 104MB unknown
sda3 ntfs 150GB
sda4 ntfs 160GB
Assuming the first OS on the disk is Windows, how did sda1 with 1MB of disk space end up with a reiserfs file system? That does not look right.
is there any way to solve it? i still remember last december i formatted my entire hard disk and installed freshly win7. when i google for reiserfs i found its belong to linux. can i delete it and try ubuntu? why i am asking tat because tat 1MB is not listed in win7 disk management.
Yes, reiserfs is a Linux file system, and it is not even the default in Ubuntu. So, that 1 MB partition has no useful function there. I thought it was a bios_boot partition, required for GPT partitioning, but that is not supposed to be formatted.
You could wipe the whole disk and reinstall, if you can afford to. Otherwise, you’d be wasting 1 primary partition.
When I have tried to install in the same fashion, I have received an error
“No root partion is defined.Please correct this from the partitioning menu.”
I am not able to understand it, though I have 66Gb free space for ubuntu 12.04.1 installation. Previously this kind of error never comes. Is there any hardware issues or somthing else.
PC Configuration:
350Gb HDD
AMD Phenom(tm)II X4 B97 3.2Ghz Processor
4GB Ram.
HELP ME Plzzz.
Did you create partitions for Ubuntu has described in this tutorial?
Thanks for the tutorial. It’s a great basic guide to the installation of a dual-boot.
Most people run into problems with a UEFI system, though, possibly because of an issue that wasn’t mentioned in the article: you’ll need to get the Ubuntu 12.04 64-bit edition, and choose the UEFI option when booting from the live CD.
I can’t personally vouch that this solution works yet, since it’s late and I’m going to try it tomorrow and let you know how it goes.
This is the link to the explanation: http://www.linuxbsdos.com/2011/09/18/guide-to-disks-and-disk-partitions-in-linux/
Hope that helps.
Does the boot partition need to be of a primary type?
I tried the installation procedure on my Sony laptop. There are MANY partitions for laptop recovery, and other purposes. When I tried to create the first Linux partition, the boot one, it game me no option to create it as a primary one. I went ahead with the other partitions, and directed GRUB2 to be installed at /boot partition. In the middle of the installation, program reported an error – not able to install into the /boot partition, asked me to select another one. Obviously, I selected to abort the installation…
Any clue how to get out of this problem?
Sorry about replying to my own msg – more information: I went back to my win7 disk manager, and there I can see the boot, root, and swap partitions all reported as primary partitions, as follows: 477MB primary (boot); 111.76GB primary (root), and 3.73GB primary (swap).
The interesting thing is that all 4 win7 partitions, as well as 3 linux partitions, are reported as primary. I thought there could exist only up to 4 primary partitions…
Comments?
One more piece of information: I went back to Linux installation partition tool, and the volumes shown are not cleanly named as /dev/sda3 (for boot partition), but rather:
/dev/mapper/isw_cagijcdieh_Volume0p6 (ext4)
I also noted that the tool no longer show any mount point…
Hmm, /dev/mapper in Ubuntu 12.04. What edition are you attempting to install?
And what is the size of the HDD, the size of the Windows partitions.
12.04 amd 64bit edition. My laptop has a win7 64bit installed. HDD SSD 512GB. I have shrunk win7 C drive to make room for 120GB unallocated space…
What does /dev/mapper mean? I confess I did not like it when I saw that…
OK, my problem is that I have a RAID as HD. I guess I need the alternate iso version…
You would not have a version of this tutorial for RAID disks, would you?
I guess the differences in installation are in the disk partitioning/creation of the /boot, / and swap areas.
In “alternate installer land”, after “Detect disks” step, when I select “Activate Serial ATA RAID”, I get the following as the reading of my ATA RAID device:
Serial ATA RAID isw_cagijcdieh_Volume0 (stripe) – 512.1 GB Linux device-mapper
#1 primary 22.1 GB ntfs
#2 primary 367.0 MB B ntfs
#3 primary 355.2 GB ntfs
logical 125.8 GB FREE SPACE
#5 logical 8.6 GB
So, I assume linux device mapper is able to coherently read my ATA RAID disks. Shall I then just select free space, and start adding partitions just as in the tutorial?
Anyone has done that before?
Quick update. I was able to create /boot, / root and swap partitions using alternate installer on my RAID0. However, installer reported a “Installation step failed” under “Select and install software”. It then offers the option to continue…but I decided to abort the installation.
Does anyone know whether it is safe to skip “Select and install software” step, and proceed with the installation?
I also headr that during “GRUB installation” step, one is not offered the choice of NOT installing in the MBR of Win7 by the alternate installer…Can anyone confirm this?
THanks
Not a good idea to skip steps. When you start doing that, it’s likely to skip more steps and you end up with a system that fails not boot.
I’m not sure of that last question about GRUB, but that should not be a problem. After installation, you can always change GRUB’s location.
I went after system messages during alternate installation. There are many error messages, and most of them related to “not finding” a particular folder supposed to be mounted in the RAID0.
So, I am bailing out. Will try next to run Ubuntu inside a VM on that machine, with all potential limitations.
Thanks
Last update. After using alternate installer disk partition on the Vaio machine, I tried to expand back Win7, and FAILED.
I had to reimage the OS back to factory condition, or else I wuld have wasted over 100GB of SSD HD – not good.
So, dont try this – wait until Ubuntu installer is able to deal with Intel Fake RAID used in latest Vaio machines.
If you are seeing more than 4 primary partitions, then the partitioning scheme is GPT-based. See this article for more on that subject.
It is my understanding that UEFI dual boots can only work with 64-bit versions of Ubuntu. I tried 64-bit Mint with no luck. I’m now going to try again with Ubuntu 12.04 64-bit and see how it goes.
If 64-bit is required, I recommend you clarify that early in the tutorial.
Well, I trying to dual-boot 64-bit Windows 8 Pro and Ubuntu 12.10 64-bit on UEFI hardware with no luck – yet. Windows 7 and Ubuntu works, a you can see from the tutorial.
I followed this tutorial and received the following error when trying to boot into Linux Mint…
“Windows failed to start
… [text here] …
File: \NST\AutoNEOGubo.mbr
Status: 0xc0000098
Info: [more text here]
Does anyone have any idea how I can get back on the tracks?
TIA…
What’s the setting on your UEFI setup utility, and could you post your drive partitions here again, where the /boot partitions starts.
Curious thing with these errors being reported is they’ve never happened in any of my test installations.
Give the whole specs on your HDD and mobo. If it matches mine, I’ll try and reproduce the error. If I wasn’t having major problems with my migration, I’d post a separate article for dual-booting Mint on UEFI hardware.
Hi finid, I have an HP P6-2120 desktop computer. It has a 1TB drive.
SDA1 Win7
SDA2 Win7
SDA3 Win7
SDA4 (Nothing here)
SDA5 /Boot
SDA6 /
SDA7 /Home
SDA8 Swap
My current approach is to turn off UEFI completely and install Mint in BIOS mode. I have a question, though. If I do that, do I need to set aside 1 MB for the Reserved BIOS boot area or is that something I should skip? I think I skipped it before and the BIOS didn’t recognize any OS to boot.
I’m afraid to try it for fear it might mess up the Win7 bootloader – even with UEFI turned off.
TIA…
finid, it just dawned on me that I didn’t follow your tutorial to the “T”. I partitioned with Miint Live CD – and that might be why it didn’t work right. I will undo my Linux partitions, expand the Win7 partition and then follow your tutorial to “T”. I’ll let you know how it goes.
finid, I’m currently going through the tutorial and I wasn’t able to simply restart and go straight to the LiveCD.
For people with a similar situation, a note that some systems might have to disable UEFI in order to boot into a LiveCD would be helpful.
There is no way that I’ve found that will let me boot into a Mint LiveCD without disabling UEFI – and that includes listing my CD/DVD as the first UEFI boot choice.
I’m going to download and burn the latest Ubuntu and try to boot with that instead. Maybe Mint is lacking the ability to boot UEFI whereas Ubuntu’s latest might have that ability.
I never had to disable UEFI for this tutorial. I’ll write something for Mint 13 soon.
My attempt with Ubuntu 12.10 failed in similar fashion as well.
I’m wondering if the HP Pavilion H/W and Boot Loader config is to blame.
I’m at a complete loss as how to proceed.
There was a warning about a Reserved BIOS boot area being required, but I didn’t it mentioned in the tutorial and I didn’t go that route for fear of possible damage to the Win7 boot loader.
Hi Finid,
Thanks for posting these tutorials.
I got the same error message as “Mint” did (Windows failed to start…AutoNeoGrub0 etc.) after following this tutorial. Got the same one when I first mistakenly followed your BIOS tutorial not realizing what UEFI was.
Trying to dual boot onto an Asus U47VC-DS51 notebook with 750gb.
Does this mean that Mint cannot be dual booted with my machine? Will I have better luck with Ubuntu?
Thanks,
Steve
great very simple tutorial, i bought a new computer a week ago, and didn’t new about the EFI technology, i ended messing everything up by not booting in UEFI mode, but then i learned how to do it and folowing this step by step all worked out.
thanks!
EasyBCD is not under an open source license and requires a paid license for commercial use.
But don’t despair there are several other options here.
One is to use grub as the bootloader.
Another is rEFInd http://www.rodsbooks.com/refind/installing.html
Another is to use the efi kernel stub and the firmware included boot menu.
What is wrong with requiring “a paid license for commercial use”?
If you are using the software in a business environment, don’t you think the developer needs to make money, too?